
Shape of Dreams Shell Guide: Unlock, Forms and Laceration Build
Unlock Shell by bringing three Small Souls from the same run to the Wooden Doll in Whispering Lotus Plateau. Once unlocked, his Laceration build revolves around two forms: red gives you a dash, while blue gives you an area attack with a brief airborne safety window.
Basic attacks switch forms, and Obsidian helps bring Laceration back quickly enough to sustain the rhythm. Learn where the gaps are before relying on repeated casts to keep you safe.
How to unlock Shell
Find three Small Souls in Whispering Lotus Plateau
Reach Whispering Lotus Plateau, the black-and-white, Japanese-inspired biome that can appear as the third stage. It is one possible route, so you will not reach it on every attempt.
Before choosing the next room, hover over the available map nodes. Look for the description “There is a small soul here.” Travel to that node, clear its enemies, and find the floating red Small Soul in the arena. Activate it to collect it, then repeat the search until you have all three.
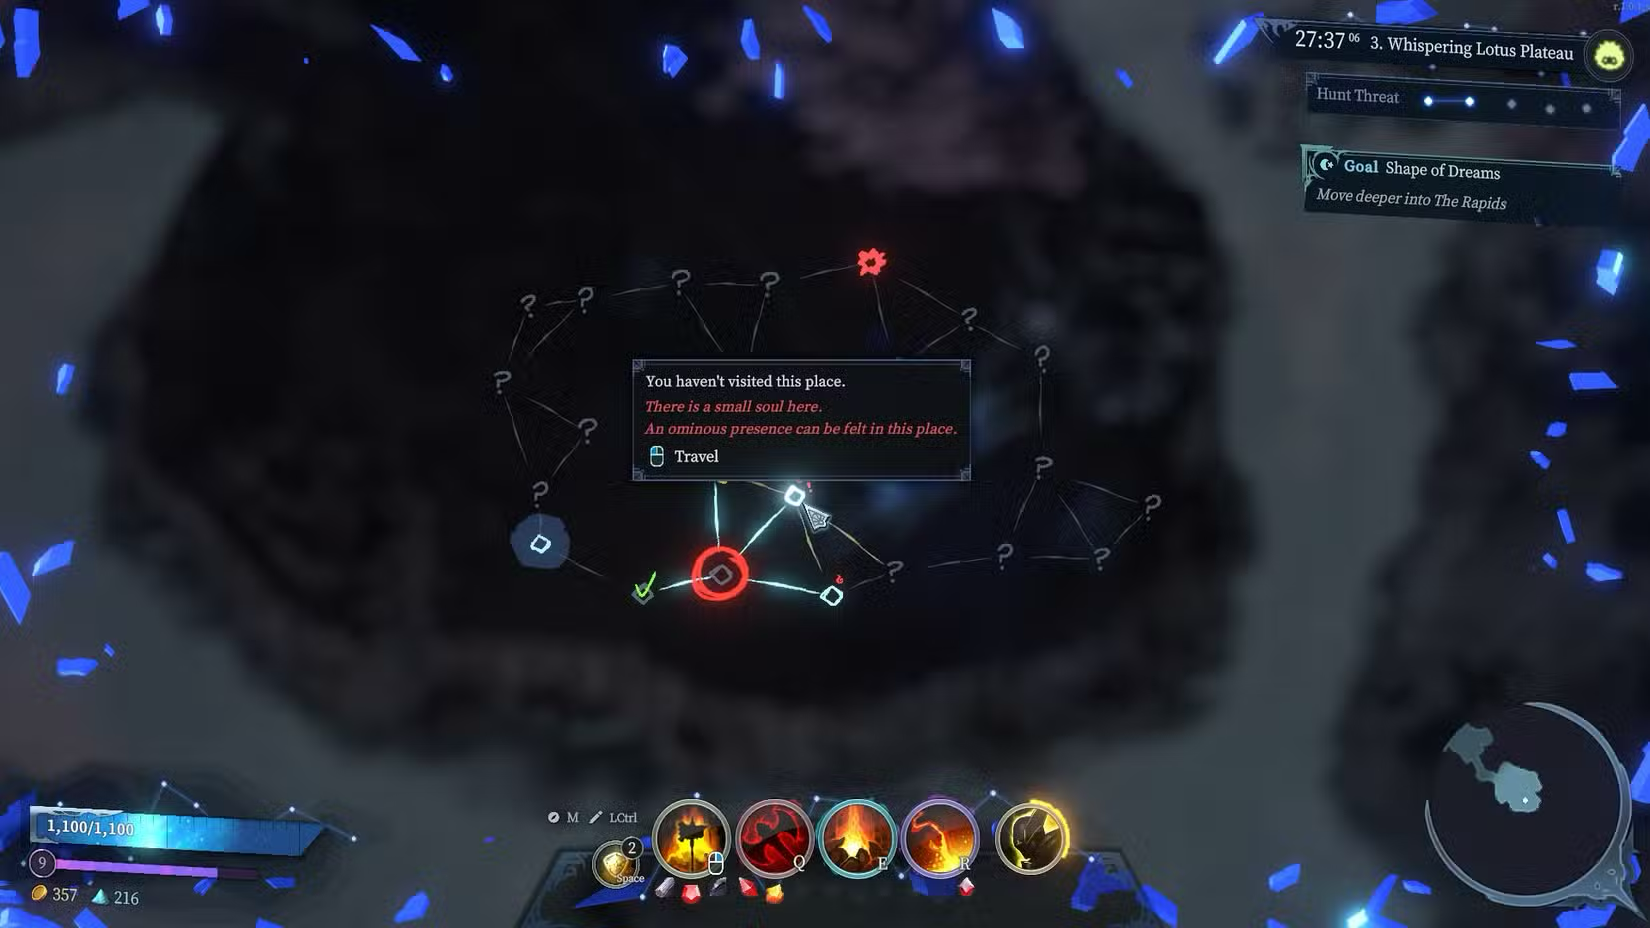
You need three souls in the same run. Explore the eligible rooms before committing to the boss approach, and keep enough health and defensive tools for the search. Repeated visits to Hunter-occupied rooms can make the trip more dangerous.
Bring the souls to the Wooden Doll
At the boss approach, look to the left before going up the steps. Find the Wooden Doll lying on the ground and interact with it while carrying all three Small Souls.
The interaction revives the doll and unlocks Shell permanently. Read the unlock feedback, then confirm that Shell is available in character selection when you return to the lobby. Merely finding or touching the doll without the three souls is not the complete unlock.
If the interaction does not work, check these points before moving on:
- You are in Whispering Lotus Plateau.
- You collected all three Small Souls during this run.
- You found the doll at the boss approach and interacted with it before leaving that area.
If you missed the required biome or its soul rooms, make another attempt. Searching unrelated maps will not complete this route.
Learn red and blue Laceration
Shell's basic attacks alternate his form, so pay attention to the form before pressing Laceration.
| Form | Main use | Important condition |
|---|---|---|
| Red Laceration | Dash damage and repositioning. | Hitting a target for the first time reduces its cooldown by 35%. Missing leaves you waiting for the cooldown. |
| Blue Laceration | A delayed area attack. | Shell is briefly invulnerable while airborne during startup, but can still take damage between repeated casts. |
His passive converts attack-speed bonuses into Attack Damage, rather than making his regular attacks swing faster in the usual way. It also makes the next basic attack after a dash or teleport a critical hit.
That supports sequences such as dash → basic attack → Laceration → basic attack. Use a movement skill just after an attack lands to bring the next basic attack forward, and track the resulting form change before committing again.
Keep direct control of Laceration. Paranoia can automatically cast an attached Memory, and putting it on your main movement skill can send you into an attack you were trying to avoid.
Build Laceration around Obsidian
| Laceration slot | Main choice | Purpose |
|---|---|---|
| Cooldown engine | Obsidian | Uses attack-effect interactions to help reset Laceration. Both forms trigger attack effects. |
| Damage | Confidence or Predation | Confidence improves damage to nearby enemies; Predation is useful against bosses and Hunters. |
| Recovery | Clemency or Umbra | Helps recover health lost during the gaps between casts. |
If Obsidian is already unlocked in Déjà Vu, choosing it before the run makes this setup more consistent. Without it, use the cooldown tools you find and take advantage of red Laceration's hit refund while searching. Do not expect the complete repeat-cast loop before the required Essence and upgrades are in place.
Precise Strike adds a 30% cooldown reduction when Laceration hits only one target. That is especially useful against isolated enemies and bosses. A blue cast that hits a crowded group does not meet the same single-target condition.
Shadow Walk is a useful backup for a missed Laceration. Its ranged follow-up triggers attack effects, giving Obsidian another opportunity to reduce Laceration's cooldown. Swift Slash also supplies movement and attack-effect opportunities that suit Shell's passive.
Keep a separate defensive tool when the run needs one. Mass Protection or Ice Shield can cover a dangerous gap; a boss-specific avoidance Memory can be worth more than another damage slot.
Choose Stars and upgrades for the early game
The early run is where an incomplete cooldown setup is most noticeable. Take Stars that help you find useful pieces and survive until they work together.
Black Market and Monstrous Charm give you more merchant opportunities. Bounty and Bizarre Spoils help with drops, while Beginner's Luck improves the first Essence you equip. These improve your chances rather than guaranteeing Obsidian or any other item.
For survival, consider Second Wind, maximum-health growth, and extra dodge support. Gunpowder-Propelled Leap adds a dodge charge and distance in this setup, but also adds one second to its cooldown. Account for the longer recharge when spending the extra charge.
Soul Acceleration helps movement cooldowns. Critical-damage Stars support the guaranteed critical hit after a dash, and early Attack Damage helps before the full Essence loop is ready.
Where to spend Dream Dust
- Raise Laceration to roughly rank five or six as an initial target, improving the skill before the Essence engine is strong.
- Invest in Obsidian quality, while continuing to take free or boss Memory upgrades when offered.
- Once cooldown recovery is dependable, improve the damage Essence for the enemies you are struggling to kill.
- Take health or recovery if the gaps between casts are ending the run.
Attack speed and Attack Damage rewards need to be compared using your passive's current conversion rate and the values offered. Passive upgrades can change which reward is better. Do not copy a fixed conversion ratio from an older setup and assume that every attack-speed choice wins.
Memory Haste is useful when other Memories still have uncomfortable downtime, but it should solve a specific gap rather than replace every damage or survival upgrade.
Use the v1.4 Annihilation Stance rules
Annihilation Stance changed in v1.4, so older descriptions can lead you to pick a Star for an effect the base Memory now has.
- Base Annihilation Stance now allows other Memories to be cast during its duration. Activating it restores a dodge charge. Its old maximum-dodge-charge and Memory Haste bonuses were removed.
- Controlled Madness now has a 12-second cooldown and lasts 3.5 seconds. Its older 14-second cooldown and four-second duration no longer apply. You no longer need it merely to gain permission to cast other Memories during Stance.
- Frenzied Blade Dance reduces Sword Wave damage by 60% and range by 80%, in exchange for two extra maximum dodge charges and 30 Memory Haste during Stance. That haste bonus permanently grows by 12 for each boss defeated. Those are this Star's benefits, not the new base Stance rules.
- Chained Bloodlust also charges all equipped Ultimates by 0.5% per basic-attack or Sword Wave hit during Stance.
Shell also gained Death Mark, Deception, and Scar of the Wind in v1.4. The Laceration route here remains a useful starting plan, but Shell is no longer a character with no alternate Memories to consider.
Recover from a broken combo
If a red dash misses, leave danger instead of standing beside the target waiting. A safe basic attack or Shadow Walk's follow-up can provide another attack-effect opportunity for Obsidian; otherwise, dodge out while the cooldown returns.
If blue Laceration spam still takes damage, treat the gap between casts as real. Add recovery and health, and preserve a dodge for the attack that lands outside the airborne window. Frequent invulnerability windows are not permanent immunity.
If a boss is preparing a large attack, stop spending every movement tool on damage. Save a dodge or time blue Laceration's safety window deliberately. For Primus's fireball phase, Repulsive Shield or Burrow can help when available.
Before the core is complete, use short engagements followed by retreat. Switching Confidence for Predation can change which targets take more damage, but neither solves a missing cooldown engine or a lack of recovery.